PlanetMinis Forums banner

Need Help with 81 YZ 60 Cylinder and Carb

25K views 46 replies 4 participants last post by  T-Dub13  
#1 ·
Before I tear into the carb and motor can anyone confirm if they are original/correct for the 81 YZ60? If not, how would I tell. Thanks for your help and opinions. More to come....

 
#2 ·
Yep, 4V0 is a YZ60 code. Thats the right motor, cylinder, carb and looks like the head too. You can't tell with the head, but the only other thing it could be is a 1981 YZ80 head and I don't think anyone would be stupid enough to bolt an 80 head on a 60.

When you find the right parts for it, you can ask you engine builder if he would raise the transfer ports .5mm for you and carve in some boyesen ports. That will wake it up enough to keep up to the KX60's.

I forgot that 1981 didn't have the YEIS boost bottle. 82 and 83 have it. Not that it did much of anything haha. ;):p
 
#4 ·
Thanks once again I appreciate it. I was confident the jug and head were correct but wasnt 100% sure on the carb. I was hoping it was right and I wouldnt need to source another part. Putting it back original or very close is my goal. The whole things gonna get torn apart in the near future and freshened up. If your referring to the exhaust as being rare let me take a couple of pics of it tomorrow and Ill throw them up. Im not sure what kind of exhaust it is but I know it isnt stock. Maybe you can help identify it and let me know if its worth restoring. Appreciate the help - Ive got a long way to go on this one its completely trashed and needs a little bit of everything.
 
#5 ·
No prob. Yeah, clean up that pipe and take some pics. I'll do my best to identify it. Possibly the boys on Marks Vintage MX site will go nuts over it. You could start a Discussion thread over there and ask for help and you might get some offers too. Or you could auction it. I'm not sure about finding a stock pipe, but there's more of them than the one you've got. Looks like the silencer is stock, so that's good. They're rare too.

I've got a pipe for the '82,'83 but it's for the left side. I'm not sure if the '81 is unique or the same as the '80 YZ50.
 
#8 · (Edited)
Nice! Sandblast it (glass bead) and paint it up with VHT black. I can't tell the manufacturer. There were lots of aftermarket pipe mfr's back in the day. LOP was from MI but they made mostly stuff for RM's I think. Look for manufacturer's markings. FMF usually marked their pipes, so did DG. Anyway, it's a true rare piece of period hop-up parts. Also, the front of the frame where the cradle splits isn't stock either. It's been reinforced significantly. This bike looks like a true racer with some good mods, not just used as a trail bike. I'm curious to see what's inside the motor.
 
#9 ·
You know what, I hadnt even noticed that the reinforcement on the front of the frame isnt stock until your mentioning it. Any idea why that was done or if I should remove it? I havent noticed any breaks or rewelds, etc on the frame but maybe I should take a second look especially up front. Now that you have me thinking about mods, Im gonna shoot a pic tomorrow of something I think is weird. There is an embossed "R" in the cylinder jug just above where it bolts to the right side case. I wonder if this could stand for "Race". I'll put that pic up tomorrow evening as I thought it was strange from the minute I saw it. It may be nothing. Thanks as always for your help. Im still trying to figure out exactly what Ive bought here. Its trashed but getting more interesting....
 
#10 ·
Hmm, I don't recall seeing any other letters other than what's normally embossed on the little flat area. I'm interested too.

About the frame, looks like you can go two ways with the bike. I think it may be a bigger effort than it's worth if you want to restore to factory stock. You might want to try researching the bike and finding out some race history on it. You could restore it to "as raced" condition. I guess it depends on how much of the bike is actually still stock haha.
 
#11 ·
A bit off topic here but I spent some time this evening going through the wiring (thankfully there isnt much). Can anyone talk me through this? The CDI box has two sets of three wires coming from it. One set of three wires connects to the three wires coming from the generator on the left side of the engine.

Regarding the remaining set of three wires from the CDI box, one wire connects to the lone wire coming from the coil, one "hot" wire goes to the throttle kill switch and one wire is a ground that connects to a connection grounded under a bolt by the coil.

The connection grounded under a bolt by the coil has dual connectors and also serves as a ground that connects to a grounding wire from the throttle kill switch as well as the CDI box. As my bike DOES NOT currently have a working throttle kill switch (there is just an empty shell of what used to be the factory one and on the frame is one somebody rigged up) and I would like to replace the factory unit, can anyone tell me if the factory kill switch has two wires coming from it (a hot and a ground) or just one wire. I have seen kill switches that are either 1 or 2 wires and am trying to determine if the extra ground wire on my bike going to the rigged up throttle kill switch is factory correct or was added later. I think detemining whether the factory throttle kill switch has 1 or 2 wires will answer the question as to whether the dual ground is correct and will allow me to move forward in a couple of areas. I hope Im being clear, please let me know if I can clarify. Thanks.

Any help is appreciated. T-Dub13 any thoughts?
 
#12 ·
#13 ·
Excellent! Just judging by a few of the things that are hacked together and amateur welded on this bike, I questioned whether the wiring was stock though I was leaning towards it being factory requiring 2 wires for the kill switch (a hot and a ground) as the connectors were all of the same style and vintage. Referencing the attached picture, as my housing is definately restorable but empty, it would need the button, wiring, and retangular piece at the top to make it functional again + anything else you may know of though I think thats it. If you have those parts collecting dust Id be interested in working some kind of deal with you if your open to it. Let me know and thanks once again.
 
#14 · (Edited)
I'll start diggin to see what I can come up with. That housing must have been used in a bunch of other bikes too. The slot on top looks like it's for a hi/lo beam switch, but my bike has nothing in there. The kill button sticks out through the lower round hole for the thumb. So you may want to try researching other yamaha's from the late 70's and see if you can identify that assembly. It may be still available new if you can get the part number.

Actually I just went on a hunch and I think I found it on a 1975 DT175. lookey here: Number 17 I think and it looks still available.

http://www.powersportsplus.com/parts/search/Yamaha/Motorcycle/1975/DT175B/HANDLE+-+WIRE/parts.html
 
#15 ·
I agree . That housing looks to have been used on several bikes but I believe only the YZ 50 and 60 utilized the thumb button . Let me know if you come across the guts for the housing and are willing to part with them. I appreciate the time . Thanks.
 
#20 ·
Thanks. Crossing my fingers you come up with something. Motors getting dropped off today so big progress is about to get made.

I have another question and while Im typing here Ill just spit it out. On the lower chain roller by the left foot peg, I have an NOS roller plus the two washers and nut which is all that is listed on the frame schematic I am referencing but it seems logical there should also be a bushing. On an undamaged frame there would be a "post" but on mine about half of that is missing. How does the roller attach to this post? Without a bushing there would be alot of play/slop in the fitment. If someone could talk me through how this attaches and if a bushing is needed I would appreciate it. Thanks.
 
#21 ·
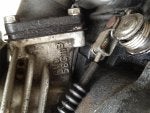
Mine was worn 1/2 way off also. You could find a sleeve to put over it to take away some of the looseness. Maybe a piece of copper refrigeration tubing. Or grind the weld off and replace the pin with a new 8mm bolt. Or better yet, replace the entire thing with an allballs roller... That's what I ended up doing, but I had to move mine anyway because of the added travel.
But yeah, that's how it goes together. Washer, roller, washer, nut.
 
#22 ·
So just to clarify, pic 1 is the post on my frame. To make the roller functional, I should drill out the bad post and tack weld in a bolt in its place roughly the diameter of the center hole in the roller (pics 2 and 3)? NO bushing is needed? How does the roller not just grind itself to pieces with no bushing present? I guess Im missing something but no bushing is mentioned as being part of the roller. Thanks.

 
#23 ·
Exactly. Refer to the original bolt and that will answer your question: It will grind itself to pieces. But bear in mind that it took 30 years haha. I would bolt or tack weld in a new bolt and use a piece of copper tubing for a bushing and grease it. Should last a good 10 years until it saws through the new one.

You can find a washer that fits inside to tighten up the wobble, but as far as I know, that's the way they're built. Maybe someone else knows better...?
 
#25 · (Edited)
Stock bore is 42mm
1st OS = 42.25mm
2nd OS= 42.5mm
3rd OS = 42.75mm
4th OS = 43mm

(And I found the following in comments on youtube)

"The KX60 stock bore is 1mm larger than the YZ60. The piston deck height is the same and they both use a 12mm wrist pin. The KX60 piston has a flat piston skirt on the intake side while the YZ60 has a window cutout. I made a template of the YZ60 intake, centered it on the KX60 piston and then used a dremel to cut it out. I first used a cutoff wheel and made three cuts to remove most of the material. Then I finished with a carbide bit and did final shaping/chamfering with a sanding drum."

Good luck! There's also a bunch of pistons and rings on ebay right now.