
Over the course of the next couple of weeks and months, I'm going to document my ongoing 1988 Honda ZB50 build step by step since the day that I bought the bike back in the summer of 2005.
The bike is still not finished, but will be by summer of 2010. Some of this information has been posted up in the forums in the past, other information will be new to all.
Historically, I'm terrible about posting up pics and details and will do my best to help everyone how not to go through a bike build.
I broke my own rule 100 times over. ~ Build it right the first time and quit playing parts swap. This will be evidenced 100 times over.
Parts used during this build are/were intertwined throughout the entire planetminis community and now ran on a number of your bikes. Some of this was due to me changing the direction on where I wanted to take the build, and other parts were sold because people needed them in a short timeframe.
Feel free to ask questions along the way, and hopefully through my organized chaos, everyone will be able to take something away from this information.
I plan on updating these at least daily and if I don't, PM me as a reminder and I'll load the daily Update.
We'll start from the top.
Beginnings...
Back in the summer of 2005, my friend Dan informed me he had just purchased a ZB50 from some lady who brought it into a dealership and wanted to trade it in on something. Dan got a smoking deal and the infamous Abe were using the bike for stunting and messing around on.
I told Dan if he ever wanted to sell the bike, I'd buy the bike. A couple of months later, the 539 original mile ZB50 was in my garage. At the time, I had no idea this project would turn into my biggest moneypit in the history of all of my past and present projects. It's all good, it's fun right?
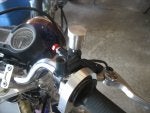
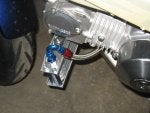
Attached are a couple of pictures of the bike before and after I purchased it back in July/August of 2005. The last pic is me taking the bike home. I met Dan in Oklahoma, we ate some low rent mexican food and I packed up the bike to head home.
The bike is still not finished, but will be by summer of 2010. Some of this information has been posted up in the forums in the past, other information will be new to all.
Historically, I'm terrible about posting up pics and details and will do my best to help everyone how not to go through a bike build.
I broke my own rule 100 times over. ~ Build it right the first time and quit playing parts swap. This will be evidenced 100 times over.
Parts used during this build are/were intertwined throughout the entire planetminis community and now ran on a number of your bikes. Some of this was due to me changing the direction on where I wanted to take the build, and other parts were sold because people needed them in a short timeframe.
Feel free to ask questions along the way, and hopefully through my organized chaos, everyone will be able to take something away from this information.
I plan on updating these at least daily and if I don't, PM me as a reminder and I'll load the daily Update.
We'll start from the top.
Beginnings...
Back in the summer of 2005, my friend Dan informed me he had just purchased a ZB50 from some lady who brought it into a dealership and wanted to trade it in on something. Dan got a smoking deal and the infamous Abe were using the bike for stunting and messing around on.
I told Dan if he ever wanted to sell the bike, I'd buy the bike. A couple of months later, the 539 original mile ZB50 was in my garage. At the time, I had no idea this project would turn into my biggest moneypit in the history of all of my past and present projects. It's all good, it's fun right?
Attached are a couple of pictures of the bike before and after I purchased it back in July/August of 2005. The last pic is me taking the bike home. I met Dan in Oklahoma, we ate some low rent mexican food and I packed up the bike to head home.